
If you use RaceTab with MIleSplit online registration, the setup time for the program for your cross country meet is about five minutes. Read on to see how!
If you don't already have a copy of RaceTab loaded to your Windows computer (ideally a laptop or netbook), you must do that first. Visit the RaceTab Download Page and get your free copy installed to your computer.
The first thing to do once you have the program downloaded and started is to enter your MileSplit online registration (the same one you use when you login to a MileSplit state site) in the upper right corner of the start page. This will enable RaceTab to view you as a MileSplit registered user and give you the access you need to download your meet entries if you have signed up for online registration for your meet. You will need to have your computer connected to the internet for this and all following steps. It is not required, however, that you have internet access at the meet site itself, though you will need it if you wish to do live results for your meet.
Once that one-time-only step is complete, you will see the same version of the start page every time you load RaceTab. It will appear as you see below:
 I
I
Under Import Meet in the lower left corner, you will see the button to Download from MileSplit. Click on that button.
That brings up a window with a calendar option. Select the date for your meet. The screen will populate with all of the meets on that date. You simply select your meet from the list of meets that appears. Then click Next. The following screen appears:
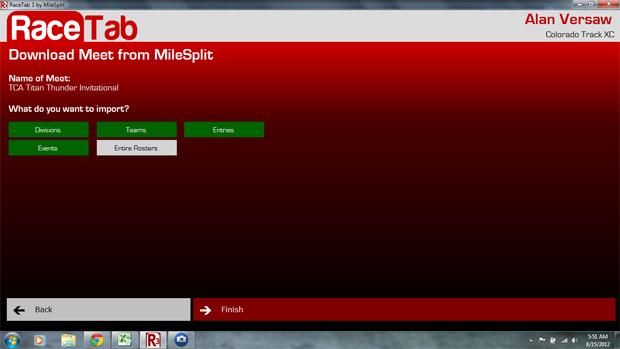
Note that the preset options are to upload Divisions, Teams, Entries, and Events. You probably do not want to import Entire Rosters for a cross country meet, and especially so if you intend to print labels and prepare bibs for your meet (It's usually best practice to simply ask registering coaches to enter all athletes they think might even possibly run in your meet. Uploading entire rosters for teams could result in massively more athletes than will actually participate in the meet, meaning a lot of wasted labels and bibs).
So, assuming you want the default options, click on Finish and wait 10 or 15 seconds. When the progress bar completes, your entire meet is uploaded to your copy of RaceTab.
There are, however, a couple of steps of preparation left to do. If your meet has both high school and middle school entries (as many meets here in Colorado do), all of those entries came through. If you click on your event tab, you should see something like HS Boys 5000 Meter Run, HS Girls 5000 Meter Run, MS Boys 3000 Meter Run, MS Girls 3000 Meter Run. The length of the middle school races will depend on what you put down on the form when you requested online registration for the meet. 5000 meters is the default race distance setting for high school in Colorado and will always appear unless you specifically requested some other race distance.
Your event, however, may not have just a simple single high school boys and high school girls race. For example, you may have both varsity and JV boys and girls races. In this case, you will need to create new events. Click on the green + sign on the Events tab to add the events you need. You can retain the HS Boys and HS Girls for your varsity races, if you wish, and simply add JV Boys and JV Girls races from the dialog box that appears. Or, you can add both Varsity and JV races and delete the HS races. Whatever works best for your purposes!
For cross country races, it does not matter what events the athletes entered will be running in. The important thing is that we've loaded all athletes possibly participating in the event. We'll know which event they run in by where their bib tags appear in the results.
Next, we need to create athlete labels. Make sure you have a supply of regular mailing address label (3 labels wide by 10 labels high) on hand.
Go to the Labels menu option above the tabs in RaceTab to design and print your labels. Print those and affix to bibs or pull tabs for your race. You are now done with the RaceTab portion of the setup for your meet. You have a few minutes of affixing labels to complete, but you're otherwise ready.
When the bib tags come in on a stringer at the meet, simply enter the bib numbers in the scoring area of the Events tab and you have your order of finish established. Once again, it is not necessary to specify beforehand which race a particular athlete is running in. It is only necessary that every potential athlete be entered into RaceTab and assigned a bib/tag number.
Questions? Send me an e-mail or enter into the Comments section of this article.
Please note that RaceTab is free, but there is a $.10 per athlete charge for online registration (minimum charge of $30). You are always welcome to use RaceTab without online registration, but we think you'll find the convenience and speed of online registration more than worth the cost. You will be billed for online registration shortly after the completion of your meet.